Friday, May 29, 2009
Fast, Accurate and Green PCR
I focused mainly on products I might use in my own lab, such as PCR reagents and basic lab products. And there was one company that had something that really made me stop and say “wow!”. ----------- Suzanne
That company was Finnzymes, and the “wow” came from three products that are individually impressive but together make a superb PCR ensemble that is compact, versatile and offers excellent speed and accuracy.
A Compact Thermal Cycler…
First up was the Piko™ Thermal Cycler, which is the smallest thermal cycler. Amazingly, this tiny instrument was around the size of a vortex mixer; with a footprint of only 16cm wide by 17 cm deep and 23 cm high and a weight of only 4 kg. Check out the picture on the right for a comparison of footprint sizes for the Piko™ and a conventional thermal cycler.
Even better, the Piko™ uses a 1/4 of the power of a normal thermal cycler, so this is one way for our experiments to be a bit greener. And it offers signficantly reduced reaction times. More on that later.
The instrument ranges in price from $4500-$6000 depending on the blocks you purchase (there are several options), so it also costs significantly less than traditional thermal cyclers.
A thermal cycler that won’t hog your bench space ticks one box. But your PCR is only as good as your polymerase, and Finnzymes have thought of that too..
A Speedy, Accurate Polymerase…
David Unger, Managing Director of Finnzymes USA, explained that the power behind Phusion™ comes from the unique dsDNA binding domain fused to a Pyrococcus-like proofreading polymerase, which results in a very tight association of the enzyme with the template DNA.
“Taq polymerases work by moving on and off the template. This slows down the enzyme and leads to difficulty if inhibitors are present.
With Phusion™, the enzyme stays linked to the template and so has a faster processivity along with the ability to work in inhibiting conditions such as 20% whole blood in the PCR reaction.”
The enzyme is twice as fast as Taq (<15 second/kb extension time) and can amplify long templates, up to 20 kb with less enzyme. Just as importantly, the error rate is 50 fold lower than Taq and 6 fold lower than standard Pyrococcus furiosus DNA Polymerases.
Sounds great (and it is). Together, Piko™ and Phusion™ offer fast, accurate and economical PCR.
But throw in Finnzymes’ patent pending UTW™ (Ultra Thin-wall) tubes and plates and the whole thing gets a lot more powerful.
96 x 5ul Reactions in 10 minutes…
The UTW™ PCR plates are, as the name suggests, ultra thin, which dramatically cuts down on the time taken to heat and cool the samples.
Piko™ is available with with a 24-well block for UTW™ 0.2 ml tubes, but for maximum output the instrument can be equipped to take Finnzyme’s 96-well UTW™ Piko™ PCR Plates.
These plates are about the size of a microscope slide and Piko™ can take up to 4 of them to make the equivalent of a 384-well plate for easy up and downstream processing with other lab equipment.
Using Phusion™, your 384 x 5 ul reactions can be completed in just 10 minutes flat. Now that’s bench-scale high throughput.
At that speed and size, even the smallest lab can forget about PCR backlogs or downtime.
Courtesy: Suzanne, BitesizeBio
Monday, May 11, 2009
RPM Does Not Equal RCF
So let’s set it out in black and white to make sure you don’t succumb to the same mistakes as those who have passed through the labs of the world before you.
How Centrifuges Work
Centrifuges work by putting your samples in rotation around a fixed axis, thereby applying an accelerative force perpendicular to the axis as shown in the diagram on the right.
And of course, this force causes particles in your sample to accelerate toward the outer edge of the rotor. Conveniently, centrifuge manufacturers design their centrifuges so that the bottom of the sample tubes are at the outer edge of the rotor so the centrifugal force results in the sedimentation of particles in your sample to the bottom of of the tube.
The amount of force required to move a particle depends on the size of the particle. Large particles (e.g. cells) require less force than small particles (e.g. precipitated proteins). For more detailed info on this, take a look at these Wikipedia articles on sedimentation and the Lamm equation.
Describing The Force
Relative Centrifugal Force (RCF) is the term used to describe the amount of accelerative force applied to a sample in a centrifuge. RCF is measured in multiples of the standard acceleration due to gravity at the Earth’s surface (x g). This is why RCF and “x g” are used interchangeably in centrifugation protocols.
The two variables that describe RCF are the radius and the angular velocity of the rotor. i.e. how wide the rotor is and how fast it is moving.
If the rotational speed is given in revolutions per minute (RPM) and the radius is expressed in centimetres (cm), then:
RCF or RPM?
From this it is clear that the correct unit for the amount of centrifugation to use in a given protocol is RCF (a.k.a. x g).
But most centrifuges, especially microcentrifuges, only have settings for RPM. So unless you are lucky enough to have a centrifuge with an RCF setting, you will have to work out the corresponding RPM that will be required for YOUR centrifuge to achieve the RCF set out in a protocol.
This can easily be done by taking your ruler, measuring the radius of your centrifuge rotor and plugging the numbers into an online converter such as this one from DJB Labcare. Alternatively, the same site also has a very useful nonograph that you can print out and keep on your bench to use for rcf to rpm conversions.
The take home message is that centrifugation speeds in quoted in RPM will only be constant for centrifuges with the same rotor radii. If you use an RPM setting from a protocol where someone used a centrifuge with a different radius from yours, you will get a different RCF. Often the difference will not be significant enough to affect the sample or the centrifuge, but sometimes, e.g. if you use an RPM setting that was originally meant for a microfuge in an ultracentrifuge, it can cause problems.
Courtesy: Nick, BitesizeBio
Thursday, May 7, 2009
Southern, northern, western (and eastern?)
This is the story of how one of the most famous and quirky naming conventions in biology came into being. It’s a story of discovery, comedy and the triumph of people power over the establishment.
Read on to find out the story of how the Southern, northern and western (etc) blots got their names.
In 1975 when Ed Southern invented his method of using a radiolabeled DNA probe to detect a specific DNA sequence within a DNA sample (e.g. a fractionated genome) and named it after himself - the Southern blot - I’m sure that he had no idea about what he had started.
Two years later, J.C. Alwine, a biologist with a sense of humor, developed a technique analogous to the Southern blot, this time for the identification of a specific RNA within a complex RNA sample using a radio-labelled DNA probe. Alwine couldn’t resist the temptation to call his technique the northern blot in an allusion to Southern’s technique, raising a chuckles in labs everywhere.
Then W. Neal Burnette, a post-doc working in the Nowinski group at the Hutchinson Cancer Center in Seattle, started the real fun.
Burnette was searching for a way to combine the powers of radio immunoassay and SDS-PAGE electrophoresis so that he could pinpoint specific antigens in a complex protein mixture, such as a cell extract.
After some “laughably naive” attempts to visualise the interaction between antibodies and the separated proteins in the gels, he was inspired by Alwine’s nothern blot method (so indirectly by the Southern blot) to make a solid phase replica of the gel. So he developed the method of using electrophoresis to blot the protein onto nitrocellulose paper and after some further work, perfected the technique of blocking non-specific binding sites and visualising the specific radioimmunolabelled antigens using an X-Ray film.
In a historic, but mostly forgotten conversation with Nowinski, Burnette coined the name “western blot” for his technique. What fun. Like nothern blotting, “western blot” was also an allusion to the Southern and nothern techniques, but Burnette had upped the ante by throwing in a geographical reference to location of the Nowinski lab. So if the Nowinski lab had been in New York, we would all be doing “eastern” blots.
A quick aside for the pedants among us. Note that among these techniques, only the Southern blot should be capitalised since it refers to Southern’s name, the others - nothern, western etc - are not proper nouns, so should not be capitalised. Try pulling your boss up on that one next time he is in mid-flow talking about a “Northern blot” in a departmental presentation.
Anyway, back to our story. Unfortunately for Burnette no sooner had he perfected his technique than a paper describing a very similar method, also inspired by nothern blotting, was published by Towbin et al working at the Friedrich Miescher Institute in Switzerland.
Burnette was dejected, but nonetheless, convinced that his methodology was sufficiently different to Towbin’s, he decided to submit a manuscript on his western blot method to the Analytical Biochemistry journal.
The reviewers hated it, they hated the name even more - obviously humor was not high on their agenda - and the manuscript was rejected.
But despite this, the popularisation of Burnette’s technique, and particularly the name “western blot” still happened even without the assistance of the literary establishment. It happened through the sense of humor of the researchers who were doing the work, through people power (assisted by Xerox power).
It happened because researchers, besides being interested in the technique itself, were tickled enough by its quirky name to make copies and send it to their friends. In Burnette’s words…
“…the few preprints I had sent to colleagues seemed to have undergone logarithmic Xerox multiplication. I began receiving phone calls from researchers unable to read the umpteenth photocopied generation of the pre-print, a sort of technical samizdat that I had to endlessly interpret”
A few years later, Burnette eventually coaxed Analytical Biochemistry into accepting his paper and it was published in 1981, but by then, word of mouth had already beaten them to it. Ironically, considering the people power that was doubtless (at least partly) responsible for it’s eventual publication, Burnette’s paper is available only to Analytical Biochemistry subscribers. *end of open access rant*
Bowen and colleagues continued the naming convention in 1981 with their publication of the southwestern blot, a technique for identifying DNA-binding proteins in nuclear protein extracts using specific oligonucleotide probes. The “south” in the name refers to the use of DNA probes, while the “west” refers to the protein blot.
Interestingly, Bowen’s paper alludes to Burnette’s western blot even though it was published before Burnette’s paper, which shows just how strongly word-of-mouth actually publicised the western blot.
And in 1998, Ishikawa and Taki published their far-eastern blotting method, no doubt a reference to their geographical location, for the analysis of lipids by TLC separation followed by blotting onto a PDVF membrane.
Finally, there is one blot that deserves mention. Legend has it that Ethan Signer coined the phrase “eastern blot” for the tantric practice of willing a failed gel into show bands. Apparently, you take your blank gel, meditate, repeat the mantra, and the bands appear…
…if only!
If you’re a biologist with a sense of humor, join in by telling us about your favorite quirky naming conventions in the comments section.
Courtesy: Nick, BitesizeBio
Low cost DNA gel documentation
You will need:
• A digital camera
• A Cokin orange filter 002A or similar (This does not have to fit onto the camera, a square filter will do.)
• A polystyrene ice bucket with a thick (3-5cm bottom)
• A UV transilluminator
To build it:
1. Cut a hole in the bottom of the box that is big enough for the camera lens to fit into.
2. Tape the filter over the hole, inside the box.
3. Set the camera flash to off and the mode to black & white.
4. Push the camera’s lens tube into the hole (or place the camera lens over the hole if there is no lens tube). Depending on the shape of your camera, you may have to modify the box to ensure that the camera is pointing straight into the hole.
5. Place your DNA gel onto the transilluminator and put the box over the gel.
6. Turn the transilluminator and the camera on. You should now be able to see the stained DNA on the gel in the viewfinder of the camera.
7. To get a quality picture and good detection limits you will have to play around with the ISO, shutter speed and aperture. This will be specific to your camera, but the setting ISO 200, Shutter speed 1/3, Aperture 8.0 worked for me so may be a useful starting point for you.
Update: Here’s a schematic diagram that shows how the whole thing should fit together. Let me know if you have any comments or questions.
Courtesy: Nick, BitesizeBio
Wednesday, April 29, 2009
Swine Flu Facts, Swine Flu Myths
Q: How safe is eating pork?
A: As safe as it ever was.
Handling and consuming animal products, such as pork, can transmit some viruses. But that's not how the H1N1 swine flu virus is spreading, said Christine Layton, a public health policy analyst with the North Carolina-based nonprofit research institute RTI International.
Swine flu is a respiratory virus, spread from person to person. In other words: A sneezing chef is a threat, not the spare ribs he's basting.
In fact, if the swine flu virus were primarily being transmitted from pigs to people, public health officials probably wouldn't be so concerned. That kind of transmission tends to limit a virus's human spread to farmers and meat workers—people who are likely to come into contact with animals' bodily fluids.
Q. Can those face masks really protect me from swine flu?
A. Yes and no.
The blue surgical masks you've seen being passed out to Mexican pedestrians are better than nothing but probably only marginally useful, said Andrew Pekosz, associate professor of microbiology and immunology at the Johns Hopkins Bloomberg School of Public Health in Baltimore, Maryland.
While such masks block the relatively large, virus-carrying droplets sneezed out by infected people, the viruses themselves are much smaller and could easily pass through. Specialty masks, designated N-95 or N-99, are better filters but still not perfect.
For better protection, Pekosz recommends combining a mask with regular hand washing and keeping 3 to 4 feet (90 to 120 centimeters) away from other people.
Q. Is this just another media health scare? How worried should we be?
A. The truth lies somewhere in between panic and eye-rolling.
Making the jump from animal-to-person to person-to-person transmission is a rare skill for a flu virus to "learn." This ability makes H1N1 swine flu potentially dangerous—and makes the concern about it a bit different from the worries over bird flu, which has yet to make such a transition.
Human-to-human transmission is a big part of why public health officials are pouring resources into swine flu and why they want you to be aware that the virus is out there.
That said, experts like Johns Hopkins's Pekosz and RTI's Layton say there's currently no reason to lock yourself up in the house.
For one thing, the cases outside Mexico have been no more serious than your average flu bug. Right now, nobody is sure why that is. And while the severity of the symptoms could increase, Pekosz said there's not really an immediate, serious threat to individuals within the United States.
"However," he said, "it certainly merits the public paying attention, and it warrants the public health efforts that have been going on in terms of monitoring and research."
Q. How does a pig-bird-human mash-up swine flu virus happen, anyway?
A. Blame the pigs, and the virus.
Flu viruses are "very messy reproducers," RTI's Layton said.
All eight flu genes replicate independently. If a cell is infected with three different flu viruses, reproduction can mean a reshuffling of genetic material from multiple parents, thrown together randomly into the "baby" flu virus.
Most of the time, those cut-and-paste viruses don't work out very well, Johns Hopkins's Pekosz said. But every so often, this natural reassortment will come up with a new flu virus that has some kind of advantage over its competitors.
H1N1 swine flu is one of those, but we've certainly seen others in the past 30 years, he said. Pigs are part of the problem because they can become infected with flu viruses from birds and humans. As such, swine seem to provide a particularly good environment for this genetic square dance to take place.
Maggie Koerth-Baker
for National Geographic News
April 27, 2009
Friday, April 24, 2009
The Basics: How Alkaline Lysis Works
1. Cell Growth and Harvesting
The procedure starts with the growth of the bacterial cell culture harboring your plasmid. When sufficient growth has been achieved, the cells are pelleted by centrifugation to remove them from the growth medium.
2. Re-suspension
The pellet is then re-suspended in a solution (normally called solution I, or similar in the kits) containing Tris, EDTA, glucose and RNase A. Divalent cations (Mg2+, Ca2+) are essential for DNase activity and the integrity of the bacterial cell wall. EDTA chelates divalent cations in the solution preventing DNases from damaging the plasmid and also helps by destabilizing the cell wall. Glucose maintains the osmotic pressure so the cells don’t burst and RNase A is included to degrade cellular RNA when the cells are lysed.
3. Lysis
The lysis buffer (aka solution 2) contains sodium hydroxide (NaOH) and the detergent Sodium Dodecyl (lauryl) Sulfate (SDS). SDS is there to solubilize the cell membrane. NaOH helps to break down the cell wall, but more importantly it disrupts the hydrogen bonding between the DNA bases, converting the double-stranded DNA (dsDNA) in the cell, including the genomic DNA (gDNA) and your plasmid, to single stranded DNA (ssDNA). This process is called denaturation and is central part of the procedure, which is why it’s called alkaline lysis. SDS also denatures most of the proteins in the cells, which helps with the separation of the proteins from the plasmid later in the process.
It is important during this step to make sure that the re-suspension and lysis buffers are well mixed, although not too vigorously (see below). Also remember that SDS and NaOH are pretty nasty so it’s advisable to wear gloves and eye protection when performing alkaline lysis.
4. Neutralization
Addition of potassium acetate (solution 3) returns the pH to neutral. Under these conditions the hydrogen bonding between the bases of the single stranded DNA can be re-established, so the ssDNA can re-nature to dsDNA. This is the selective part. While it is easy for the the small circular plasmid DNA to re-nature it is impossible to properly anneal those huge gDNA stretches. This is why it’s important to be gentle during the lysis step because vigorous mixing or vortexing will shear the gDNA producing shorter stretches that can re-anneal and contaminate your plasmid prep.
While the double-stranded plasmid can dissolve easily in solution, the single stranded genomic DNA, the SDS and the denatured cellular proteins stick together through hydrophobic interactions to form a white precipitate. The precipitate can easily be separated from the plasmid DNA solution by centrifugation.
5. Cleaning and concentration
Now your plasmid DNA has been separated from the majority of the cell debris but is in a solution containing lots of salt, EDTA, RNase and residual cellular proteins and debris, so it’s not much use for downstream applications. The next step is to clean up the solution and concentrate the plasmid DNA.
There are several ways to do this including phenol/chloroform extraction followed by ethanol precipitation and affinity chromotography-based methods using a support that preferentially binds to the plasmid DNA under certain conditions of salt or pH, but releases it under other conditions.
Courtesy: Nick, BitesizeBio
The Best Way to Desalt DNA for Electroporation
Under standard electroporation conditions, the electric field of 12-18 kV/cm generated in a 0.1mm-gap electroporation cuvette means that the conductivity of the sample must be kept very low to prevent arcing. This means that any more than a very small amount of ligation mixture added to the competent cells will cause the sample to arc and the electroporation to fail.
So Schlaak et al looked at various methods of de-salting the DNA and compared how well the purified samples performed in electroporation. And their results were quite illuminating.
The experimental set-up was pretty simple. They took 1ng (high conc) or 3pg (low conc) intact pUC19 in 100ul of ligation reaction mix and desalted the samples using eitherethanol precipitation, gel filtration, drop dialysis or a commercial microcolumn(the type used for gel extraction/PCR cleanup), resuspending in a final volume of 50ul.
Then the resulting sample was used to transform 50ul of electrocompetent E.coli and the number of resulting colonies counted. Each experiment was performed in triplicate.
The Results…
As the table shows, for the high concentration samples the microcolumns were the clear winner, although dialysis and gel filtration gave just a 2-fold lower efficiency.
But the difference was more marked with the low concentration samples. Again, the microcolumns were the best, but this time they were at least 100x more efficient than any of the other methods.
For some reason, ethanol precipitation, a widely used method of desalting DNA, gave miserable results for both samples. It’s not clear whether this effect only occurs in the hands of these authors, or whether using a carrier would have helped (they didn’t). But it is certainly worth noting.
The take home message
For desalting 1ng or 3pg of intact plasmid, commercial microcolumns gave superior transformation efficiencies compared with the other methods.
The effect was far more obvious with 3pg of plasmid, which is worth noting, because many of the ligations you do will have DNA concentrations in this range.
So maybe using microcolumns for desalting your ligation mixes could improve your results…
If you give it a try, let us know how it goes.
Reference
1. Schlaak et al Biotechnology Letters (2005) 27:1003-1005
Courtesy: Nick, BitesizeBio
Sunday, April 19, 2009
Why You Should Never Trust a Patent
If you search the literature using a comprehensive search engine like Google Scholar, you will get several types of articles listed. Most of them are peer reviewed journal
articles and many are patents.
But beware of an important distinction between the two: Although patents can contain useful information, they are not authoritative because they are not peer reviewed. And although patents are designed to protect commercially exploitable ideas, an invention does not have to be commercially viable to have a patent granted.
The scrutiny that the Patent Office puts a patent under is completely different to peer reveiw. To be issued, the invention described just has to be novel, non-obvious, and “useful”.
And even patents that don’t meet those basic parameters can slip through the net. Here are 10 glaring and hilarious examples, which to me highlight why you should never trust a patent.
Non-novel patents… A basic premise of patents is that the invention should be novel. These certainly aren’t:
1. Method of swinging on a swing
The abstract for United States Patent 6368227 reads “A method of swing on a swing is disclosed, in which a user positioned on a standard swing suspended by two chains from a substantially horizontal tree branch induces side to side motion by pulling alternately on one chain and then the other.”
I’m pretty sure I invented that when I was a kid.
2. Method of exercising a cat
I bet the inventor of United States Patent 5443036 thought he was onto a winner when he came up with this amazing method of exercising a cat while sitting in your armchair, armed with just a laser pen. The illustration for the invention is shown in the head image for this article.
But although it’s lame, the really startling thing about this one is that it is an example of a non-novel patent being published since the patent office has granted essentially the same patent several times:
6505576 Pet Toy
6557495 Laser Pet Toy
6651591 Automatic laser pet toy and exerciser
6701872 Method and apparatus for automatically exercising a curious animal
Totally useless inventions: Proof that patented inventions are not necessarily commercially viable.
3. Light bulb changer
How many inventors does it take to change a light bulb? None now that the ludicrously complicated automatic lightbulb changer (shown right) described by United States Patent 6826983 is here.
4. Motorized ice cream cone
All of the fun of an ice cream cone, but none of the work, just stick your tongue out, turn on the motorised ice cream cone and enjoy. Thanks United States Patent 5971829.
Would you buy one?
5. Beerbrella
Now this one might actually be a winner. The abstract for United States Patent 6637447, entitled “Beerbrella” reads:
The present invention provides a small umbrella (“Beerbrella”) which may be removably attached to a beverage container in order to shade the beverage container from the direct rays of the sun. The apparatus comprises a small umbrella approximately five to seven inches in diameter, although other appropriate sizes may be used within the spirit and scope of the present invention. Suitable advertising and/or logos may be applied to the umbrella surface for promotional purposes. The umbrella may be attached to the beverage container by any one of a number of means, including clip, strap, cup, foam insulator, or as a coaster or the like. The umbrella shaft may be provided with a pivot to allow the umbrella to be suitably angled to shield the sun or for aesthetic purposes. In one embodiment, a pivot joint and counterweight may be provided to allow the umbrella to pivot out of the way when the user drinks from the container.
The diagram shown on the right explains it much more clearly. A classic.
Does ANYONE actually read patents anyway?
6. Display control apparatus for image forming apparatus
This one is unbelievable. It seems that United States Patent Application 20040161257 was written on behalf of the inventor by a writer with a sense of humor. Claim 9 reads:
The method of providing user interface displays in an image forming apparatus which is really a bogus claim included amongst real claims, and which should be removed before filing; wherein the claim is included to determine if the inventor actually read the claims and the inventor should instruct the attorneys to remove the claim.
This wasn’t picked up by the inventor, or the patent examiner. So does anyone read patents?
Technically misleading patents: Don’t believe everything you read
7. Device for the treatment of hiccups
United States Patent 7062320 (shown right) claims “a device for the treatment of hiccups, and more specifically, to a method and apparatus for the treatment of hiccups involving galvanic stimulation of the Superficial Phrenetic and Vagus nerves using an electric current.”
In fact it’s a glass that give you a small shock when you drink from it. Ridiculous in itself but the pseudoscientific claims made in the patent are laughable.
8. Paddle wheel rotorcraft
United States Patent 5265827 claims “An aircraft having vertical takeoff and landing capability having at least first and second laterally extending paddle wheels rotatable on a central axis generally perpendicular to the longitudinal axis of the aircraft and between its nose and tail. Each of the paddle wheels has a plurality of blades pivoted by a system of linear actuators to a determined optimum blade pitch angle.”
So an aeroplane that works like a paddle steamer? I’m no engineer, but despite the inventor’s claims, that’ll never fly.
Special mention… Just when you thought patents couldn’t get any more ridiculous:
9. Apparatus for facilitating the birth of a child by centrifugal force.
The title and diagram (right) say it all. I wonder why the invention described in United States Patent 3216423 didn’t catch on?
10. A Method for Concealling Partial Baldness
United States Patent 4022227 This is the king among ridiculous patents, and has won an Ig Noble Prize for its sheer absurdity.
The “Method for Concealling Partial Baldness” is in fact a comb-over. Yes, in 1977 father and son team Frank and Donald Smith of Orlando, Florida spent a lot of money to patent a way to comb hair.
Claim 1 stamps down the invention in bold terms…
“A method for styling hair to cover bald areas using only the individual’s own hair, comprising separating the hair on the head into several substantially equal sections, taking the hair on one section and placing it over the bald area, then taking the hair on another section and placing it over the first section, and finally taking the hair on the remaining sections and placing it over the other sections whereby the bald area will be completely covered.”
The hot invention in question is pictured below.
From a CBS new interview with Donald Smith :
“The combover patent was born when the late Frank Smith and his son Donald, both of Orlando, Florida, began discussing Frank’s baldness over some wine in 1977. Frank shaved his head, but had so many knocks that “it didn’t look good at all,” his son said. “So we went to Plan B.”
A toupee was out of the question. Donald noticed his dad had plenty of hair on the sides of his head. Why not grow one side long and sweep it over the top?
“It seemed a hell of a lot more practical,” Donald said.
The combover patent — complete with instructional diagrams — was meant to allow Frank to bill himself as the father of the hairstyle and better sell a spray he developed to hold it in place, his son said. They never got around to producing the spray, but they did receive an Ig Nobel.”
Saturday, April 18, 2009
The Basics: How Phenol Extraction Works
Phenol extraction is a commonly used method for removing proteins from a DNA sample, e.g. to remove proteins from cell lysate during genomic DNA preparation. It’s commonly used, but not commonly understood.
If you want to know how it works so you can show off to all of your friends… read on.
The basic protocol
I’ll start with a quick outline of how the procedure is performed. First, a volume of phenol is added to the aqueous soup containing the proteins and the DNA to be purified.
Since phenol and water are immiscible, two phases form - a water (a.k.a. aqueous) phase and a phenol phase. Phenol is the more dense of the two liquids so it sits on the bottom.
The phases are then mixed thoroughly. This forces the phenol into the water layer where it forms an emulsion of droplets throughout. The proteins in the water phase are denatured and partition into the phenol, while the DNA stays in the water.
The mixture is then centrifuged and the phases separate. The DNA-containing water phase can now be pipetted off, and the phenol/protein solution is discarded. Commonly, the DNA is then de-salted and concentrated using ethanol precipitation.
First, a bit about solvents
To explain how the addition of phenol can separate DNA and proteins, we need to briefly touch on solvents. This is the chemistry bit… bear with me.
A solvent is a substance, normally a liquid, that can dissolve other substances. Broadly, solvents can be classified according to their polarity, which depends on how extreme the spread of the electron density in the molecule is.
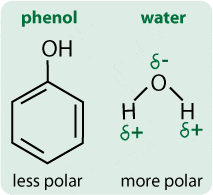
Water is a very polar solvent because the oxygen atom is very electronegative so it “sucks” the electrons towards it and away from the hydrogens, creating a slight negative charge on the oxygen and a slight positive on the hydrogens. i.e. the charge is “polarised” within the molecule.
Phenol is a less polar molecule than water. Although it has a highly electronegative oxygen, this is counteracted by the phenyl ring, which is also very electronegative so there is no concentration of electron density around the oxygen. i.e. the charge is not so polarised in a phenol molecule.
DNA is most soluble in the water phase
So what does this have to do with the separation of DNA and protein?
Well in general, polar (charged) compounds dissolve best in polar solvents and non-polar molecules dissolve best in less polar or non-polar solvents.
DNA is a polar molecule due to the negative charges on it’s phosphate backbone, so it is very soluble in water and less so in phenol. This means that when the water(+DNA +protein) and phenol are mixed in the protocol, the DNA does not dissolve in the phenol, but remains in the water phase.
The solubility of the proteins is flipped by phenol
But, proteins are a different story entirely.
As you know proteins are made up of long chains of amino acids. Each amino acid has it’s own characteristics, due to the nature of their side chains. Some, (e.g. phenylalanine, leucine, and tryptophan) are non-polar, because their side chains contain no charged entities. Conversely, amino acids with side chains containing charged entities (e.g. glutamate, lysine and histidine) are polar.
The polarity differences in the side chains are biologically important because they largely determine how peptides fold into functional proteins. Put simply, the chains fold so that as many as possible of the side chains that are less polar than the solvent are on the inside of the proteins (away from the solvent), while those that are of similar polarity to the solvent are arranged on the outside of the proteins (see panel 1 in the figure above). Another way to think about it is that polar side chains are hydrophilic, and non-polar are hydrophobic. The hydrophobic side chains hide on the inside, with the hydrophilic chains on the outside.
In the cell (and note, I am talking about cytoplasmic proteins here), the proteins are folded according to the influence of water as the solvent, but when the proteins are exposed to a less polar solvent, like phenol, their folding changes (see panel 2 in the figure).
Basically, the proteins flip inside-out. The less-polar residues, which hid inside the protein structures in water, now want to interact with the less-polar phenol so are forced to the outside. Conversely, some of the very polar residues may flip to the inside of the globular protein to be shielded from the unsuitable new solvent.
In short the proteins are permanently denatured by the new solvent environment provided by the phenol.
Whereas in water the polar residues on on the outside of the proteins made them soluble in water, the phenol-induced folding changes forced the phenol-favoring residues to outside so that the proteins are now more more soluble in phenol than in water.
And this is the basis of the separation. The phenol-soluble proteins partition to the phenol phase while, as discussed above, the water soluble, polar DNA molecules stay in the water phase (see panel 3 in the figure).
So that’s how phenol extraction works. If you have any questions, or corrections, be sure to let me know.
Courtesy: Nick, BitesizeBio
Plasmid v Genomic DNA Extraction:The Difference
If you want to isolate plasmid DNA, you crack your cells open and carry out a miniprep, trying very hard not to get any contaminating genomic DNA in your sample. If you want genomic DNA, you crack your cells open in a different way and try to isolate as much of the stuff as possible.
So what’s the difference?
In this article, I’ll explain how both plasmid and genomic DNA preps work and how they are different.
Genomic DNA Extraction:
1. Lysis: Just Crack Them Open
Genomic DNA extraction is the simpler of the two procedures because all that is needed is a good strong lysis to release the genomic DNA into solution. For yeast, plant cells and bacteria, this involves breaking down the strong, rigid cell wall before mechanically disrupting the membrane. The cell wall can normally be broken down using enzymes such as lysozyme, which catalyses the hydrolysis of the cell wall peptidoglycans and the serine protease, proteinase K (and for gram+ species, lysostaphin will help). For more exotic species with different cell wall compositions, different enzymes may be required.
A more universal method of lysis for genomic DNA extraction involves mechanically breaking the cell wall. One method for this is bead beating, which can be easily performed on a vortex using 0.1 mm glass beads or 0.15 mm fine garnet beads. Special vortex adapters help with performing multiple extractions at the same time with equal efficiency. Bead beating is faster than enzymatic lysis and generally more thorough.
2. …and purify
Once the sample has been lysed so bringing the genomic DNA into solution, all that is needed is to purify the sample. This can be achieved using either phenol-chloroform or a spin filter membranes by adding guanidine salts that promote binding to silica.
3. Some words of advice
The chromosome is going to break during purification because it is much too big to stay in one piece. But for most applications this is not a problem and for PCR or qPCR, the breakage will be an advantage because it allows better melting the DNA and result in a more efficient reaction.
The E.coli chromosome is 4,638, 858 bp long and this comes to roughly .005 picograms per cell. In a typical overnight culture started from a single colony, the bacteria number around 1-2×10⁹ bacteria/ml. That means that 1 ml of culture should yield about 5 µg of genomic DNA per 109 bacteria.
Plasmid DNA Extraction
Plasmid DNA extraction is a bit more complicated because it involves separating the plasmid from the genomic DNA. The separation of the two forms of DNA is based on size…
…and the trick is in the lysis method.
1. Alkaline Lysis
For plasmid DNA extraction, the lysis has to be a lot more subtle than simply chewing up the cell wall with enzyme or bashing it with glass beads. The (virtually) universal method for plasmid DNA extraction was invented by Birnboim and Doly in 1979.
The lysis buffer contains sodium hydroxide and SDS, the purpose of which is to completely denature of the plasmid and genomic DNA (i.e. separate the DNA into single strands). It is critical that this step is performed quickly because too long in the denaturing conditions of this solution may result in irreversibly denatured plasmid at the end.
Next the sample is neutralized in a potassium acetate solution to renature the plasmid.
And this is the key to the separation of the plasmid and genomic DNA.
Because plasmid is small, it can easily re-anneal. But the genomic DNA is too long to re-anneal properly and instead it becomes tangled so the complimentary strands stay separated.
When the sample is centrifuged, the genomic DNA is still bound to protein and gets pulled down while plasmid DNA is soluble and free. It is key at this step not to vortex or mix the sample vigorously because the genomic DNA is easy to break, and broken genomic DNA can be small enough to re-anneal and go into solution with the plasmid.
2. Purification
The plasmid DNA is recovered in the supernatant and can now be ethanol precipitated for a crude prep or cleaned up using phenol-chloroform or a spin filter based prep. If you are using a spin filter prep, the neutralization buffer will already contain guanidine salts so the lysate can be bound directly onto silica for further washing and elution. The pure DNA is fine for most everything from cloning to sequencing. If the plasmid is to be used for transfection, anion-exchange purification is a better choice to remove the endotoxin, although endotoxin removal is available using faster silica based purification also.
The method for purifying plasmids can also be used for mammalian plasmids transfected in eukaryotic cells or for any other small extra-chromosomal DNA. The difference for mammalian cells or chloroplast/mitochondrial DNA is that the copy numbers are much smaller compared to the high copies of plasmid that can be obtained. So expect a lower yield if you try the plasmid method on another type of DNA isolation or scale up your buffer accordingly if you decide to start with more sample.
3. …and some words of advice.
Plasmid DNA is typically 3-5 kb and then the size is increased based on the insert. The type of origin of replication will affect how high the copy number will be per cell. A typical high copy number plasmid such as pUC or pBluescript should yield between 4-5 µg of DNA per ml of LB culture.
To isolate high yields of plasmid DNA, the culture should be in late log phase or early stationary phase. Prepare cultures using fresh single colonies from plates and make sure the antibiotic is fresh and the correct strength to maintain the plasmid during growth. It is important not to overgrow the culture or it may result in genomic DNA contamination in the plasmid prep.
Hopefully that was clear and helpful for you, but if not, you know what to do….
Courtesy: Suzanne, BitesizeBio
Thursday, April 16, 2009
Low-Tech lab gadgets and solutions
Want to be like MacGyver and figure out a cheaper or faster way to make or do something useful using everyday items.
So here is top ten list of favorite lab MacGyverisms; ways to use everyday items to make gadgets and low-tech solutions for the.
10. Scoops or Measuring Cups = no more weighing. Do you weigh out yeast extract, NaCl, and agar for each bottle when preparing media? Save time by weighing the amount of powder that fits in a measuring cup or scoop and then adjust the volume of media in each of your flasks.
Designate one scoop for each powder added and just put one scoop of each per bottle. Weigh once…scoop forever after.
9. Straws = free pasteur pipettes. Plastic straws lifted from fast-food chains can be used for dilutions and innoculations. This may take some experimentation, but I have done this for making hundreds of innoculations for a screening assay without ever having to buy expensive plastic pipettes.
Of all the varieties I tested, McD straws are the best and will actually survive autoclaving (wrapped in bunches of 20 inside aluminum foil!).
The trick is to use a consistent size test tube for dilutions and adjust the volume so that, when the straw is placed into the tube, almost exactly 0.5-1.0 ml ends up in the straw.
You then place your finger over the open end and transfer the liquid. To release the payload, take your finger off the top.
In a similar vein, don’t forget about toothpicks or wooden stir sticks for replica plating.
8. Spaghetti Colander = no more dropped gels. Instead of using a spatula to move your gels from stain to rinse solutions and risk dropping your gel on the floor (butter-side down, of course), use a small plastic colander fitted inside of a bowl, and several bowls of the same size for the washes. That way you can just pick up the colander and move it to the next wash station.
7. Body wash or shampoo = cheap blot washes. Cheap liquid soap can be used for washings. Shampoo contains Sodium Lauryl Sulfate and can substitute for expensive wash solutions in many types of blots.
Don’t forget that you can use zip-loc baggies instead of a seal-a-meal for hybs too. To get all the air bubbles out, place a hollow stir straw in the corner and make sure all the bubbles go out the straw as you zip it up. Then slide the straw out while you cinch up the last little corner.
6. Instant Milk = long life blocking agent. Powdered milk or cream liquor can be used as a casein-enriched blocking agent for your blots. It may not be any cheaper to use Bailey’s Blotting Juice, but there is an obvious added advantage, plus you never have any stale leftovers.
5. Petroleum Jelly = super-cheap hot start. ‘A little dab’ll do ya’ to “hot start” your Polymerase Chain Reactions. [see Horton et al, 1994]
4. Coffee Grinder = personal minifuge. You can use an old coffee grinder as a mini-centrifuge by modifying it to have rings for holding two eppendorf tubes for quick spins. An old-fashioned hand crank mixer or egg beater also works for this application.
If you use duct tape (not on the list since it is so obvious!) to hold it on a C-clamp, you can screw it onto the lab bench in any convenient location.
3. Toothpaste = DIY miniprep matrix. Some brands of toothpaste contain diatomacieous earth (Celite) as an abrasive. I’ve not tried this myself, but rumor has it that you can separate out the particles and use them as a matrix for binding DNA in mini-preps.
2. Furniture polish = fresh-smelling and silanized plates. Instead of using Rain-X for silanizing glass plates for polyacrylamide gels, use furniture polish. Spray on, wipe off. You also gain points for doing all the lab benches along the way, and extra credit for using the lemon scented variety to freshen up the place.
And the number one low-tech gizmo of all-time is…
1. Record player = shaking incubator. Bob Horton’s homemade shaking incubator was fashioned out of an old-time record player. The plans were originally posted to the bionet methods and reagents bulletin board and highlighted in my monthly column in TiBS under the subtitle “Spin Doctor” [see Hengen, 1996].A classic MacGyverism.
So what ingenious low-tech solutions do you use in your lab?
References:
1. Horton RM, Hoppe BL, Conti-Tronconi BM. 1994. AmpliGrease: “hot start” PCR using petroleum jelly. Biotechniques 16:42-43.
2. Hengen PN. 1996. Methods and reagents. Eliminating banding artifacts from SDS-PAGE. Trends in Biochemical Sciences 21:191-193.
Courtesy: BitesizeBio